Back to Smartcitizen.me

Enclosure modification

I had an issue fitting the SCK into the 3D printed enclosure while the battery was plugged in. While there is a groove / inset to allow for the wires to go against the side, the groove misaligns with the battery connector by 2-3 cm. I ended up having to grind part of the #D enclosure down with a dremel in order to get it to fit nicely. http://i.imgur.com/9BZ5jDG.jpg

Unfortunately, I did not take a before picture, but if you look at the after picture, you can still see a little lip on the top of the marred area that shows that the edge of the inset hits the middle of the connector.

If you rework the 3d printing, I’d also suggest adding a grove & a hole for the solar panel connection. I had to string the cables through the mounting holes of the board to make it work.

Nice! :slight_smile: Once again, thanks a lot for your feedback @CKCKCKCK1. We will take good note of all your suggestions and I will personally take good care of this 3d printed enclosure redesign. A new batch of SCKs is also on the way so we will have to double check that the new components added to the board (as the Through Hole USB Connector) fit correctly. All the best. :slight_smile:
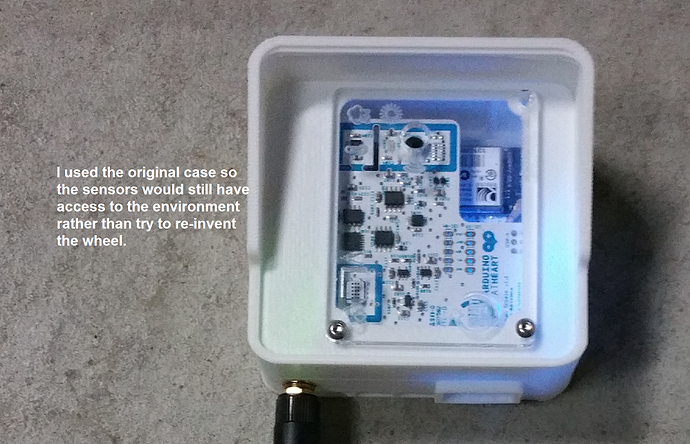
Hi, I recently received my smart citizen (Apr 2014) and noticed similar issues to the above post where the case battery slot is still 3 mm misaligned. However by seating the battery connector fully and tightly bending wires around the edge for the battery to sit underneath the unit, I was able to get all in to the case. I noticed that the kit doesn’t come with any plastic stand off pins to set the board height distance above the battery? Also I can’t not find a reference to size of the button battery/type for the clock? The clear plastic cover fits in well and rests on the ledge provided but will fall out if not sealed in some how. I am thinking of a very light beads of silicon at corner points to hold it. I also noticed with all the various holes that provide access for the unit to outside ambient data and cooling that weather protection is possibly an issued. It would be helpful if a pdf or similar instruction manual could be put together for download.
Thanks

Hi @markki. Yes, you are right. The kit doesn’t come with any plastic stand off pins. If you think on any way to implement stand offs on the design it would be great to share it here in the forum. The button battery fir the RTC is CR1220. We are working on a documentation site where all this info will be available to view/download but we still need time and help to complet it. All the best.

Can we have the access to the 3d printed enclosure files so we can modify and re-print? I ordered the enclosure, and I have the “new” sdk and it still does not fit.

Better still; can we get the files for the suggested enclosures in the Kickstarter material?
Supposedly they were made with the help of professional designers & they looked really nice.

I have a sneaky suspicion neither of them were very much involved in the current enclosure?

@wakeforest + @MaxHeadroom: you can find the 3d printed enclosure files here: http://www.thingiverse.com/thing:236976 Anyway, double check the files as they might be not updated to the latest latest revision of the kit. The microUSB was displaced a bit when it was changed to a through hole version! For the enclosures in the kickstarter materials, we do not have these files. I can try to ask for them but i can not promisse anything. Best.

Pity, 'cose they were beautiful.

Regards/M

I modified (slightly) the case design in Makerware and re-printed it, everything fits well into the case now without having to bend the battery wire: http://www.thingiverse.com/make:91170. My third image shows the dimensions I used. I’m also designing a cover that utilizes the laser cut one that came with my SCK: http://acrobotic.com/sensors/sck-00004.html. I’ll post the results when I’m done.

Hi guys,

@MaxHeadroom: You are right! They were beautiful. Hopefully, we will get the designers back to work on that soon.

@rohwer: Thanks a lot for sharing your modifications with us. We would love to sea any other modification, hack or mod you make. :slight_smile:

All the best,
Aitor.

Hi guys,

for a citizen science project we’re using this quick hack of an enclosure. Thought to share in case anyone is in need of a quickly put together outdoors enclosure.

cheers,

Jani

hi @randomm! Thanks a lot for sharing your hack with us. :slight_smile:

Sorry, forgot to post a picture of the case and cover. Here is is now:


I didn’t see any real change in my data when I added the cover, do I think it might me a good long-term option.

Let me know if anyone is interested in me posting the build files to Thingaverse.

-Matt
SCK685